
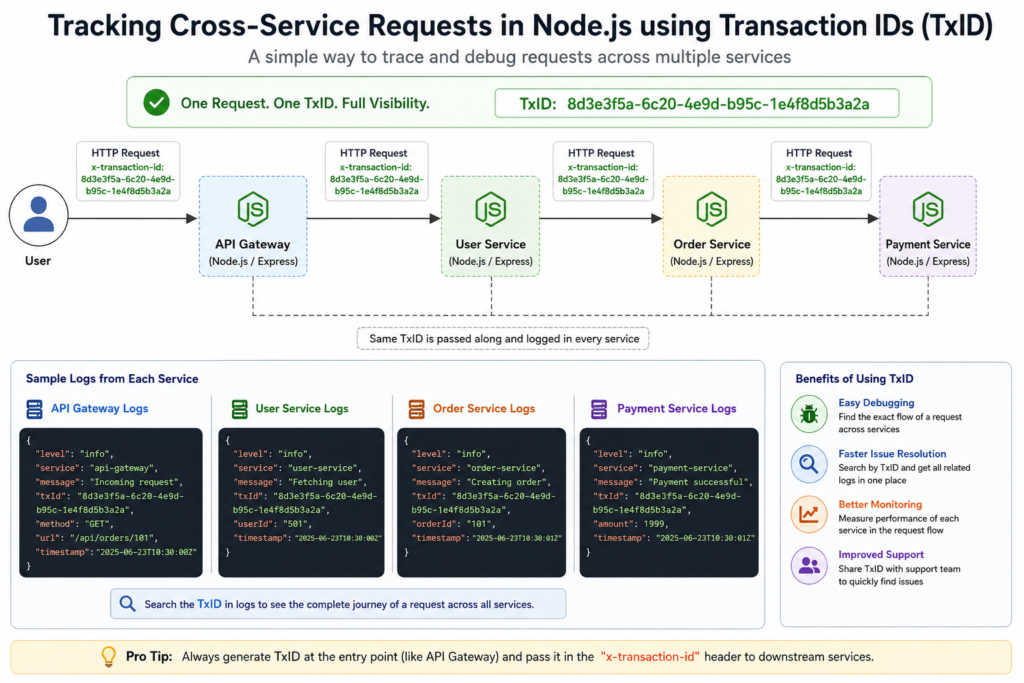
When a user clicks a button on your website, the request may not stay inside one server. In modern applications, one request can travel through many services.
For example:
A frontend app calls an API Gateway.
The API Gateway calls the User Service.
The User Service calls the Order Service.
The Order Service calls the Payment Service.
Now imagine something fails. The user says, “My payment failed.” You check the logs, but every service has its own logs. It becomes difficult to find which log belongs to the same user request.
This is where Tracking Cross-Service Requests in Node.js using a Transaction ID, also called TxID, becomes very useful.
A Transaction ID is a unique ID attached to every request. The same ID is passed from one service to another. When you search this ID in logs, you can see the full journey of that request.
In simple words, TxID helps you answer:
- Where did the request start?
- Which services handled it?
- Where did it fail?
- How long did each service take?
- Which logs belong to the same request?
In this blog, we will learn how to implement Transaction ID tracking in Node.js and Express with beginner-friendly examples.
What Is a Transaction ID TxID?
A Transaction ID is a unique value generated for each incoming request.
Example:
x-transaction-id: 8d3e3f5a-6c20-4e9d-b95c-1e4f8d5b3a2aCode language: HTTP (http)This ID is added to request headers and logs. When one service calls another service, it forwards the same TxID.
For example:
Frontend → API Gateway → User Service → Payment ServiceAll services will use the same Transaction ID.
TxID: 8d3e3f5a-6c20-4e9d-b95c-1e4f8d5b3a2aCode language: HTTP (http)This makes debugging much easier.
Why Tracking Cross-Service Requests in Node.js Is Important
Tracking Cross-Service Requests in Node.js is important because backend systems are becoming more distributed.
Earlier, many applications had one backend server. Today, applications often use:
- Microservices
- API gateways
- Third-party APIs
- Background jobs
- Message queues
- Serverless functions
- Payment gateways
- Authentication services
Without a Transaction ID, logs may look like this:
User request received
Order created
Payment failed
Database timeout
But you do not know which user request caused which error.
With TxID, logs become much better:
[txId=8d3e3f5a] User request received
[txId=8d3e3f5a] Order created
[txId=8d3e3f5a] Payment failed
[txId=8d3e3f5a] Database timeoutCode language: CSS (css)
Now you can search the TxID and see the complete story.
Common Use Cases of Transaction IDs
Transaction IDs are useful in many real-world cases.
Debugging Production Issues
When a user reports an issue, you can ask for the request ID or check the logs by TxID.
Tracking API Calls
You can track how one API request moves from one service to another.
Monitoring Microservices
In microservices, one user action can touch many services. TxID connects those logs.
Improving Customer Support
Support teams can share TxID with developers. Developers can quickly find the related logs.
Auditing Important Operations
For payments, orders, login, and profile updates, TxID helps track important actions.
Step-by-Step Implementation in Node.js and Express
Now let us implement Tracking Cross-Service Requests in Node.js using Express.
We will create:
- A Transaction ID middleware
- A logger helper
- A sample API service
- A downstream service call
- TxID forwarding between services
Step 1: Create a Node.js Project
Create a new folder:
mkdir txid-node-demo
cd txid-node-demo
npm init -y
Install Express:
npm install expressIf you want to call another service, install Axios:
npm install axiosUpdate package.json to use ES modules:
{
  "type": "module",
  "scripts": {
    "start": "node server.js"
  }
}Code language: JSON / JSON with Comments (json)
Step 2: Create Transaction ID Middleware
Create a file named txidMiddleware.js.
// txidMiddleware.js
import { randomUUID } from "node:crypto";

const TX_ID_HEADER = "x-transaction-id";

export function txidMiddleware(req, res, next) {
  const incomingTxId = req.headers[TX_ID_HEADER];

  const txId =
    typeof incomingTxId === "string" && incomingTxId.trim() !== ""
      ? incomingTxId
      : randomUUID();

  req.txId = txId;

  res.setHeader(TX_ID_HEADER, txId);

  next();
}Code language: JavaScript (javascript)
Explanation
This middleware does three things:
- Checks if the request already has
x-transaction-id. - If not, it creates a new TxID using
randomUUID(). - Adds the TxID to the request and response.
This means every request will have a Transaction ID.
Step 3: Add Middleware to Express App
Create server.js.
// server.js
import express from "express";
import { txidMiddleware } from "./txidMiddleware.js";

const app = express();

app.use(express.json());
app.use(txidMiddleware);

app.get("/", (req, res) => {
  res.json({
    message: "Welcome to TxID demo",
    txId: req.txId
  });
});

app.listen(3000, () => {
  console.log("Server running on http://localhost:3000");
});Code language: PHP (php)
Start the server:
npm startOpen this URL in browser:
http://localhost:3000Code language: JavaScript (javascript)You should get a response like:
{
  "message": "Welcome to TxID demo",
  "txId": "8d3e3f5a-6c20-4e9d-b95c-1e4f8d5b3a2a"
}Code language: JSON / JSON with Comments (json)
Now every request has a unique TxID.
Step 4: Add a Simple Logger Helper
Good logging is very important for Tracking Cross-Service Requests in Node.js.
Create logger.js.
// logger.js
export function logInfo(req, message, extra = {}) {
  console.log(
    JSON.stringify({
      level: "info",
      txId: req.txId,
      message,
      ...extra,
      timestamp: new Date().toISOString()
    })
  );
}

export function logError(req, message, error, extra = {}) {
  console.error(
    JSON.stringify({
      level: "error",
      txId: req.txId,
      message,
      error: error.message,
      stack: error.stack,
      ...extra,
      timestamp: new Date().toISOString()
    })
  );
}Code language: JavaScript (javascript)
Now update server.js.
// server.js
import express from "express";
import { txidMiddleware } from "./txidMiddleware.js";
import { logInfo, logError } from "./logger.js";

const app = express();

app.use(express.json());
app.use(txidMiddleware);

app.get("/orders/:id", (req, res) => {
  logInfo(req, "Fetching order details", {
    orderId: req.params.id
  });

  res.json({
    orderId: req.params.id,
    status: "success",
    txId: req.txId
  });
});

app.use((err, req, res, next) => {
  logError(req, "Unhandled error occurred", err);

  res.status(500).json({
    message: "Something went wrong",
    txId: req.txId
  });
});

app.listen(3000, () => {
  console.log("Server running on http://localhost:3000");
});Code language: JavaScript (javascript)
Now your logs will include the TxID.
Example log:
{
  "level": "info",
  "txId": "8d3e3f5a-6c20-4e9d-b95c-1e4f8d5b3a2a",
  "message": "Fetching order details",
  "orderId": "101",
  "timestamp": "2026-06-23T10:30:00.000Z"
}Code language: JSON / JSON with Comments (json)
This is much easier to search in production logs.
Step 5: Pass Transaction ID to Another Service
Now let us say Service A calls Service B.
Install Axios if not already installed:
npm install axiosUpdate server.js.
// server.js
import express from "express";
import axios from "axios";
import { txidMiddleware } from "./txidMiddleware.js";
import { logInfo, logError } from "./logger.js";

const app = express();

app.use(express.json());
app.use(txidMiddleware);

app.get("/checkout/:orderId", async (req, res, next) => {
  try {
    logInfo(req, "Checkout request received", {
      orderId: req.params.orderId
    });

    const paymentResponse = await axios.get("http://localhost:4000/payment", {
      headers: {
        "x-transaction-id": req.txId
      }
    });

    logInfo(req, "Payment service response received", {
      paymentStatus: paymentResponse.data.status
    });

    res.json({
      message: "Checkout completed",
      orderId: req.params.orderId,
      payment: paymentResponse.data,
      txId: req.txId
    });
  } catch (error) {
    logError(req, "Checkout failed", error);
    next(error);
  }
});

app.use((err, req, res, next) => {
  res.status(500).json({
    message: "Something went wrong",
    txId: req.txId
  });
});

app.listen(3000, () => {
  console.log("Order Service running on http://localhost:3000");
});Code language: JavaScript (javascript)
Here, we are forwarding the same TxID to Payment Service using request headers.
This is one of the most important steps in Tracking Cross-Service Requests in Node.js.
Step 6: Create the Payment Service
Create another file named paymentService.js.
// paymentService.js
import express from "express";
import { txidMiddleware } from "./txidMiddleware.js";
import { logInfo } from "./logger.js";

const app = express();

app.use(express.json());
app.use(txidMiddleware);

app.get("/payment", (req, res) => {
  logInfo(req, "Payment service called");

  res.json({
    status: "paid",
    provider: "demo-payment-gateway",
    txId: req.txId
  });
});

app.listen(4000, () => {
  console.log("Payment Service running on http://localhost:4000");
});Code language: JavaScript (javascript)
Run both services in two terminals.
Terminal 1:
node server.jsCode language: CSS (css)Terminal 2:
node paymentService.jsCode language: CSS (css)Now call:
curl http://localhost:3000/checkout/101Code language: JavaScript (javascript)You will see that both services use the same Transaction ID.
Step 7: Send Transaction ID from Client
Sometimes the frontend or API Gateway may already send a TxID.
Example:
curl http://localhost:3000/checkout/101 \
  -H "x-transaction-id: custom-client-txid-123"Code language: JavaScript (javascript)
Your backend should reuse the incoming TxID instead of creating a new one.
This is useful when:
- Request starts from frontend
- API gateway creates TxID
- Load balancer adds request ID
- Another service already generated TxID
Step 8: Add TxID to Error Responses
When an API fails, return the TxID in the response.
app.use((err, req, res, next) => {
  logError(req, "API error", err);

  res.status(500).json({
    success: false,
    message: "Internal server error",
    txId: req.txId
  });
});Code language: JavaScript (javascript)
Now users or support teams can share the TxID with developers.
Example response:
{
  "success": false,
  "message": "Internal server error",
  "txId": "8d3e3f5a-6c20-4e9d-b95c-1e4f8d5b3a2a"
}Code language: JSON / JSON with Comments (json)
This is very helpful in production debugging.
Step 9: Using AsyncLocalStorage for Cleaner Code
In large applications, passing req everywhere can become messy.
Node.js provides AsyncLocalStorage, which can store request-specific data across async operations.
Create requestContext.js.
// requestContext.js
import { AsyncLocalStorage } from "node:async_hooks";

export const requestContext = new AsyncLocalStorage();

export function getTxId() {
  const store = requestContext.getStore();
  return store?.txId;
}Code language: JavaScript (javascript)
Update middleware:
// txidMiddleware.js
import { randomUUID } from "node:crypto";
import { requestContext } from "./requestContext.js";

const TX_ID_HEADER = "x-transaction-id";

export function txidMiddleware(req, res, next) {
  const incomingTxId = req.headers[TX_ID_HEADER];

  const txId =
    typeof incomingTxId === "string" && incomingTxId.trim() !== ""
      ? incomingTxId
      : randomUUID();

  req.txId = txId;
  res.setHeader(TX_ID_HEADER, txId);

  requestContext.run({ txId }, () => {
    next();
  });
}Code language: JavaScript (javascript)
Now update logger:
// logger.js
import { getTxId } from "./requestContext.js";

export function logInfo(message, extra = {}) {
  console.log(
    JSON.stringify({
      level: "info",
      txId: getTxId(),
      message,
      ...extra,
      timestamp: new Date().toISOString()
    })
  );
}

export function logError(message, error, extra = {}) {
  console.error(
    JSON.stringify({
      level: "error",
      txId: getTxId(),
      message,
      error: error.message,
      stack: error.stack,
      ...extra,
      timestamp: new Date().toISOString()
    })
  );
}Code language: JavaScript (javascript)
Now you can log without passing req to every function.
logInfo("Order service started processing request");Code language: JavaScript (javascript)This makes the code cleaner in bigger Node.js applications.
Best Practices for Tracking Cross-Service Requests in Node.js
1. Use a Standard Header Name
Use a clear header name like:
x-transaction-idOther common names are:
x-request-id
x-correlation-id
Choose one and use it everywhere.
2. Generate TxID at the Entry Point
The first service should generate the TxID if it does not already exist.
Usually this is:
- API Gateway
- Backend API
- Load balancer
- Main Express app
3. Always Forward TxID to Downstream Services
When Service A calls Service B, forward the same TxID.
headers: {
  "x-transaction-id": req.txId
}Code language: JavaScript (javascript)
If you forget this step, tracking will break.
4. Add TxID to Every Log
Every important log should include TxID.
Good log:
{
  "txId": "abc-123",
  "message": "Payment failed"
}Code language: JSON / JSON with Comments (json)
Bad log:
Payment failed5. Return TxID in Error Response
Do not expose sensitive error details to users, but it is safe and useful to return TxID.
{
  "message": "Something went wrong",
  "txId": "abc-123"
}Code language: JSON / JSON with Comments (json)
6. Validate Incoming TxID
Do not blindly trust very large or invalid header values.
Example:
function isValidTxId(value) {
  return typeof value === "string" && value.length <= 100;
}Code language: JavaScript (javascript)
Then use it in middleware:
const txId = isValidTxId(incomingTxId) ? incomingTxId : randomUUID();Code language: JavaScript (javascript)7. Use Structured JSON Logs
JSON logs are easier to search in tools like:
- Datadog
- New Relic
- Elastic Stack
- Grafana Loki
- CloudWatch
- Google Cloud Logging
8. Do Not Use TxID as Authentication
TxID is only for tracking. It should not be used for login, security, or access control.
9. Use Distributed Tracing for Large Systems
TxID is a simple and powerful first step. For larger systems, you can also use distributed tracing standards like W3C Trace Context and tools such as OpenTelemetry.
Common Mistakes
Mistake 1: Creating a New TxID in Every Service
This is a common mistake.
Wrong flow:
API Gateway TxID: aaa
User Service TxID: bbb
Payment Service TxID: ccc
Correct flow:
API Gateway TxID: aaa
User Service TxID: aaa
Payment Service TxID: aaa
The same TxID should travel across services.
Mistake 2: Logging TxID Only in One Place
If you log TxID only at the start of the request, it may not help much.
You should log TxID in:
- Request start
- Important business steps
- External API calls
- Database errors
- Final response
- Error handler
Mistake 3: Not Returning TxID in Error Response
If an API fails and the user cannot share TxID, debugging becomes slower.
Always return TxID in error responses.
Mistake 4: Using Random Short IDs
Avoid very short IDs like:
12345Use UUIDs instead:
8d3e3f5a-6c20-4e9d-b95c-1e4f8d5b3a2aUUIDs reduce the chance of duplicate IDs.
Mistake 5: Mixing TxID with User ID
Do not use user ID as transaction ID.
A user can make many requests. Each request should have a unique TxID.
Mistake 6: Forgetting Background Jobs
If your request creates a background job, pass the TxID to that job also.
Example:
await queue.add("send-email", {
  userId,
  txId: req.txId
});Code language: JavaScript (javascript)
Then logs inside the worker can also use the same TxID.
Transaction ID vs Correlation ID vs Request ID
These terms are often used in similar ways.
Transaction ID
A unique ID for one business transaction or request flow.
Request ID
A unique ID for one HTTP request.
Correlation ID
An ID used to connect logs across multiple systems.
In many projects, teams use one ID for all these purposes. That is okay for small and medium applications.
For example, you can use:
x-transaction-idor
x-correlation-idThe most important thing is consistency.
Conclusion
Tracking Cross-Service Requests in Node.js using Transaction IDs TxID is one of the simplest ways to improve backend debugging.
When one request travels through many services, logs can become confusing. A Transaction ID connects those logs and shows the full request journey.
In this blog, we learned how to:
- Generate a Transaction ID in Express
- Store TxID in request object
- Add TxID to response headers
- Log TxID with every important event
- Forward TxID to downstream services
- Use TxID in error responses
- Use AsyncLocalStorage for cleaner logging
- Avoid common mistakes
For small applications, a simple x-transaction-id middleware is enough. For larger systems, you can combine this with distributed tracing tools like OpenTelemetry and W3C Trace Context.
If you are building APIs, microservices, or backend systems with Node.js, start adding Transaction IDs early. It will save a lot of debugging time when your application grows.
Tracking Cross-Service Requests in Node.js is not difficult, but it gives a big improvement in production support, logging, and system reliability.