Intro
GraphQL API has become one of the most powerful tools for building modern APIs. Unlike REST, it allows clients to request exactly the data they need, making applications faster and more efficient.
In this guide, you will learn how to build a this API using Node.js from scratch, and also understand how to structure it for real-world production use.
By the end of this article, you’ll be able to create scalable APIs using GraphQL and Node.js.
Want to learn more about GraphQL? Check out these helpful resources:
How to Merge Multiple Resolvers in GraphQL
Build GraphQL API with Node.js
What is GraphQL?
it is a query language for APIs that allows clients to request only the data they need.Instead of multiple REST endpoints like:/users
/users/:id
/users/:id/posts
You can use a single GraphQL endpoint:
/graphql
And fetch everything in one request.
Why Use GraphQL?
Here are some key advantages:
– Fetch only required data (no over-fetching)
– Single endpoint for all operations
– Strongly typed schema
– Better developer experience
Project Setup (Step-by-Step)
Let’s set up our GraphQL API project from scratch.
Step 1: Open Your IDE
- Open VS Code (or any IDE you prefer)
- Open a folder where you want to create your project
Now open the Terminal inside VS Code
(Shortcut: `Ctrl + “)
Step 2: Create Project Folder
In the terminal, run:
mkdir graphql-api
This creates a new folder named graphql-api
Now move into that folder:
cd graphql-api
Step 3: Initialize Node.js Project
Run:
npm init -y
This will:
- Create a
package.jsonfile - Set default configurations automatically
Step 4: Install Required Packages
Now install the dependencies:
npm install express @apollo/server graphql cors body-parser
What These Packages Do (Important)
express
- A minimal web framework for Node.js
- Helps us create a server and handle routes
@apollo/server
- Apollo Server for GraphQL
- Used to build and run our GraphQL API
graphql
- Core GraphQL library
- Provides schema and query execution functionality
cors
- Allows cross-origin requests
- Required when frontend and backend run on different domains
body-parser
- Parses incoming request bodies (JSON)
- Helps server read request data
Note: In modern Express, express.json() can replace body-parser
Step 5: Create Entry File
Create a file named:
index.js
This will be the starting point of our server
What’s Next?
Now that the setup is ready, we’ll:
Create a basic GraphQL server using Express and Apollo Server
Create Basic Server
const express = require("express");
const cors = require("cors");
const { ApolloServer } = require("@apollo/server");
const { expressMiddleware } = require("@as-integrations/express5");

const app = express();

const typeDefs = `#graphql
  type Query {
    hello: String
  }
`;

const resolvers = {
  Query: {
    hello: () => "Hello, GraphQL!",
  },
};

async function startServer() {
  const server = new ApolloServer({ typeDefs, resolvers });
  await server.start();

  app.use(
    "/graphql",
    cors(),               // 👈 enable CORS
    express.json(),
    expressMiddleware(server)
  );

  app.listen(4000, () => {
    console.log("Server running on http://localhost:4000/graphql");
  });
}

startServer();
Code language: JavaScript (javascript)
Add Start Script in package.json
Open your package.json file and update the scripts section:
"scripts": {
  "start": "node index.js"
}
This allows you to start your server using a simple command.
Run the Server
In terminal, run:
npm start
You should see:
Server running on http://localhost:4000/graphql
Test Your GraphQL API
Option 1: Browser (Easiest)
Open your browser and go to:
You’ll see GraphQL Playground / UI.
Run this query:
query {
  hello
}
Option 2: Postman
- Open Postman
- Create a POST request
- URL: http://localhost:4000/graphql
- Body → JSON:
{
  "query": "{ hello }"
}
Expected Response
{
"data": {
"hello": "Hello, GraphQL!"
}
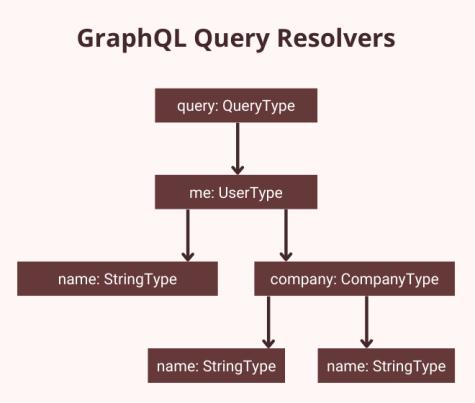
}Understanding Schema & Resolvers
Schema defines the structure of your API.
Resolvers define how data is fetched.
Example:
- Query → defines what client can ask
- Resolver → returns the data
Adding Real Data
So far, our API returns a simple string.
Now let’s make it more practical by returning structured data.
We’ll create a list of users and update our schema to fetch that data.
const users = [
  { id: "1", name: "John" },
  { id: "2", name: "Jane" },
];

const typeDefs = `
  type User {
    id: ID
    name: String
  }

  type Query {
    users: [User]
  }
`;

const resolvers = {
  Query: {
    users: () => users,
  },
};Code language: JavaScript (javascript)
Here, we defined a User type and updated our Query to return a list of users.
The resolver simply returns the users array.
Production Tips
- Use database (MongoDB/PostgreSQL)
- Add authentication (JWT / session)
- Use DataLoader to avoid N+1 problem
- Add logging and monitoring
- Handle errors properly
Conclusion
GraphQL provides a powerful way to build flexible and scalable APIs. With Node.js and Apollo Server, you can quickly build production-ready APIs.
Start small, and gradually move towards advanced topics like authentication, caching, and performance optimization.